Now that we covered the basics of the graphics
pipeline and some of the math that is involved, let’s see how these
concepts relate to the types exposed by XNA Game Studio and draw some
triangles on the screen.
GraphicsAdapter
Use the GraphicsAdapter
class to enumerate and update graphics adapters. Most single monitor
PCs have one graphics adapter that represents their physical graphics
card and the one connection it has to the monitor. Some graphics cards
provide two graphics adapters so you can plug two monitors into a single
graphics card. In this case, the GraphicsAdapter
allows for selecting two different adapters so you can display the
graphics on two different monitors. The Xbox 360 and Windows Phone
devices provide only one GraphicsAdapter.
The static GraphicsAdapter.DefaultAdapter
property returns the default adapter in which there are multiple
adapters to chose from. For example, when you set the left monitor to be
the primary display in Windows, the DefaultAdapter property returns the GraphicsAdapter to display graphics on the left monitor.
The static GraphicsAdapter.Adapters
property returns a read-only collection of the adapters available. You
rarely need to enumerate graphics adapters. Most commercial PC games
provide a settings page that enables the user to select the adapter so
he or she can change which display to view the game. This is required
when the game runs in full screen and the user does not have the normal
window controls to click and drag.
If your game uses windowed mode, the user can click and draw the window to the other monitor. Although this changes the GraphicsAdapter used, all of this is handled for the user by XNA Game Studio by default.
Note
If you developed games using a
native graphics API before and tried to support monitor dragging and
toggling between windowed and full-screen modes, you know the trouble to
get it working properly.
The GraphicsAdapter
provides several properties and methods that enable you to determine
what type of graphics card is available and what the capabilities of the
graphics card are.
The QueryBackBufferFormat and QueryRenderTargetFormat
methods can be used to determine whether a specific back buffer or
render target format is supported.
The DeviceName, Description, DeviceId, VendorId, SubSystemId, and Revision properties are used to return information about a specific GraphicsAdapter
to determine whether the graphics card is a specific model from a
specific manufacturer. They also enable you to determine what the
current driver version is.
Note
A graphics driver is a piece of
software that enables the operating system to communicate with the
graphics hardware. Graphics card manufacturers create the driver to
instruct the operating system on how to perform specific tasks with the
hardware.
Each GraphicsAdapter
can support a number of display modes. Just as you can set your PC to
use different resolutions, your game can use different resolutions. The SupportedDisplayModes returns a collection of DisplayMode structures. Each structure contains properties for the Width, Height, and Format for the display mode. A display format is defied using the SurfaceFormat
enumeration. The format defines how each pixel on the screen is
represented in terms of the data that is stored at each pixel. The most
common format, SurfaceFormat.Color, is a 32-bit value that stores four channels of red, green, blue, and the alpha each with 8 bits of value.
The DisplayMode structure also provides two helper properties called AspectRatio and TitleSafeArea. The AspectRatio
is the value you get when you divide the width of the display by the
height of the display. This is often calculated when working with 3D
graphics and is sometimes calculated incorrectly. The property gives you
a simple way to retrieve the value without having to calculate the
value each time you need it.
When drawing to televisions,
they have outer edges of the screen cut off. If you draw to the top
left corner of the screen and display this on a number of televisions,
you will notice that each television has a slightly different position
of where the top left corner is. The TitleSafeArea
defines where you should limit drawing game specific graphics such as
text and the heads up display for a character. Using the property
ensures that your graphics are visible across different televisions.
GraphicsDevice
The GraphicsDevice
in your game is responsible for issuing the drawing commands down to
the driver, which then goes through the graphics pipeline. The GraphicsDevice is also responsible for loading graphics resources such as textures and shaders.
Every GraphicsDevice
contains a back buffer. The back buffer is the data buffer where the
graphics that ultimately end up displayed on your monitor are drawn to.
It is called the back buffer because it is not displayed on the screen.
What you see displayed on the screen is actually the contents of what is
called the front buffer. Drawing occurs to the back buffer, so you
don’t see each piece of geometry appear on the screen as it is drawn.
After all of the draw calls are performed in a single frame, the GraphicsDevice.Present method is called, which flips the front and back buffers to display the contents of the back buffer.
Along with a width and height, the back buffer also has a SurfaceFormat, which defines the bit layout and use for each pixel in the back buffer. As we discussed, the GraphicsAdapter can be used to determine what formats are available. The most common is the Color format.
If a back buffer
resolution that is smaller than the display is requested on the Xbox 360
or on a Windows Phone, the final image is up scaled to fit the screen.
If the aspect ratio is different, then the display black bars are
displayed on the top and bottom of the screen called letterboxing or on
the sides of the screen called pillarboxing to fill out the extra space.
When calling the Present method, you specify a PresentInterval.
The present interval is used to determine when the flip of the front
and back buffers occur. Displays on computer monitors, televisions, and
phone screens all have a refresh rate. The refresh rate is the speed
that the displays update their physical screen commonly between 30Hrz to
60Hrz. When displays update, they do so by updating line by line until
the entire screen is updated. At that time, the display performs a
vertical retrace sometimes referred to as a vblank. This is when the
screen is moving from the end of where it is currently updating to the
start again. If the front and back buffers are flipped in the middle of
the display, updating a graphical artifact called tearing can occur.
Tearing is where part of the displayed screen shows one frame while
another portion displays another. This occurs if the flip is not in sync
with the vertical retrace because you change what is drawn on the
screen in the middle of the display updating the display. To prevent
this, the flip should occur during the vertical retrace.
When you set the PresentInterval, you have three options of when the flip between the front and back buffers occurs. If PresentInterval.One
is used, the buffers wait to flip until the display is in the vertical
retrace phase. This means the fastest your graphics can update is the
same speed as your display’s refresh rate. PresentInterval.Two is used only to flip the buffers every other vertical retrace. PresentInterval.Immediate
can be used to perform the flip as soon as possible and not wait for
the vertical retrace. Although your game can suffer from tearing
artifacts, this mode is helpful when performing performance analysis
because it does not limit the speed at which your game can draw.
Along with the back buffer, a GraphicsDevice
can also contain another buffer called the depth buffer. The depth
buffer is used to store the depth values of a triangle when the color of
that triangle is written to the back buffer. The values are used in the
depth test position of the graphics pipeline that we discussed
previously. A depth buffer can have three types of formats specified by
the DepthFormat enumeration. The first is Depth16, which stores a 16-bit floating point value at each pixel. Depth24 provides a 24-bit floating point number to store depth at each pixel. Finally, the Depth24Stencil8
format provides the same 24 bits for depth but also enables another 8
bits to be used by the stencil buffer. The stencil buffer is used in the
stencil test portion of the graphics pipeline.
Creating the GraphicsDevice
Although it is possible to create the graphics device yourself using the GraphicsDevice constructor, this is not needed when using Game class because the default template creates a GraphicsDeviceManager, which creates the GraphicsDevice.
If you want to change any of the default values that the GraphicsDeviceManager uses to create the graphics device, you can use code similar to the following in your Game class constructor.
public Game1()
{
    // Create new graphics device manager that will create the graphics device
    graphics = new GraphicsDeviceManager(this);
    // Set the width and height we would like for the back buffer
    graphics.PreferredBackBufferHeight = 800;
    graphics.PreferredBackBufferWidth = 480;
    // Set the back buffer format to color
    graphics.PreferredBackBufferFormat = SurfaceFormat.Color;
    // Set the depth format to have depth and stencil values
    graphics.PreferredDepthStencilFormat = DepthFormat.Depth24Stencil8;
    // We don't want to use multisampling
    graphics.PreferMultiSampling = false;

    Content.RootDirectory = "Content";
}
The GraphicsDeviceManager.SupportedOrientations
can be used to define which orientations you want your game to support.
This is useful for Windows Phone games where the user can flip the
physical phone device and might do so because of the requirements of the
game. If you elect to support an orientation when the user rotates the
phone, the screen flips to support the new orientation. For example, if
you want to support a landscape game where the user can play the game by
rotating the phone to the left or right, use the following lines of
code:
graphics.SupportedOrientations = DisplayOrientation.LandscapeLeft |
                                 DisplayOrientation.LandscapeRight;
Now
when the user rotates the phone from one horizontal position to the
other, the display automatically flips and your game appears correctly
for the new orientation.
Reference Devices
There is a special type
of graphics device called a reference device also known as ref device. A
reference device does not use the graphics hardware and implements all
of the graphics functionally in software on the computer’s CPU. A
reference device can be used when the graphics hardware does not support
some specific graphics feature. The downside is that the reference
device is tremendously slow compared to graphics hardware.
Drawing with Primitives
If you have never developed 3D
graphics applications, this is where you become a graphics developer for
the first time.
Primitive Types
XNA Game Studio supports four types of primitives defined by the PrimitiveType enumeration: TriangleList, TriangleStrip, LineList, and LineStrip. A TriangleList
is a list of triangles just like its name implies. Every three vertices
are treated as a new triangle meaning that each triangle requires three
vertices to be stored. In most cases, this is overkill because most
triangles are directly next to another triangle. With a TriangleStrip,
the last three vertices are used to draw the next triangle. For
example, you can draw two triangles with only four vertices. The first
three vertices make up the first triangle and the last vertex is used in
conjunction with the last two vertices from the first triangle to form
the second triangle. Using triangle strips helps reduce the amount of
memory required to store the vertices of triangles. The TriangleStrip is by far the most common PrimitiveType used.
The ListList is similar to
the triangle list except that only two points are needed to form a
single line. Every two points creates a new line segment. The LineStrip
is similar to a triangle strip except that only the last point from the
previous line segment is needed to form another line.
Vertex Types
Each vertex that
makes up the triangle contains the position data for where the triangle
is in space, but it can also contain other data such as the color that
the triangle should be, texture coordinates for textured triangles, or
normal data for lighting calculations. XNA Game Studio provides several
ways to build in vertex types that can be used when defining your
triangles or lines. You can also create your own vertex types for more
complex rendering scenarios.
Drawing Primitives
There are ways to render geometric primitives in XNA Game Studio. All four methods are provided by the GraphicsDevice class. The first two methods—DrawUserPrimitives and DrawUserIndexedPrimitives—both work by specifying an array of vertices and a primitive type to the GraphicsDevice, which, in turn, draws the primitives.
The second two methods—DrawPrimitives and DrawIndexedPrimitives—use
vertices that have been stored on the graphics hardware. Storing vertex
data directly on the graphics hardware lowers drawing latency because
the data needed to draw the geometry is already in memory in the
graphics hardware near where the computations are occurring.
Along with vertex data, the two indexed methods—DrawUserIndexedPrimitives and DrawIndexedPrimitives—also
use index values that are used to index into the vertex data. Instead
of using the vertex data directly to draw the primitive, indexed
vertices are defined using an offset into the vertex data. This saves
space when multiple primitives use the same vertex.
DrawUserPrimitives
The easiest way to draw a primitive on the screen is to declare an array of vertices and pass these to the DrawUserPrimitive method. Along with the vertices, we create an instance of BasicEffect.
Define the following member variables in your Game class:
VertexPositionColor[] userPrimitives;
BasicEffect basicEffect;
Next, define the vertices and create a new instance of BasicEffect and set some of the properties. Add the following lines of code in your Game class LoadContent method:
// Create the verticies for our triangle
userPrimitives = new VertexPositionColor[3];
userPrimitives[0] = new VertexPositionColor();
userPrimitives[0].Position = new Vector3(0, 1, 0);
userPrimitives[0].Color = Color.Red;
userPrimitives[1] = new VertexPositionColor();
userPrimitives[1].Position = new Vector3(1, -1, 0);
userPrimitives[1].Color = Color.Green;
userPrimitives[2] = new VertexPositionColor();
userPrimitives[2].Position = new Vector3(-1, -1, 0);
userPrimitives[2].Color = Color.Blue;

// Create new basic effect and properites
basicEffect = new BasicEffect(GraphicsDevice);
basicEffect.World = Matrix.Identity;
basicEffect.View = Matrix.CreateLookAt(new Vector3(0, 0, 3),
                                       new Vector3(0, 0, 0),
                                       new Vector3(0, 1, 0));
basicEffect.Projection = Matrix.CreatePerspectiveFieldOfView(MathHelper.PiOver4,
                                              GraphicsDevice.Viewport.AspectRatio,
                                              0.1f, 100.0f);
basicEffect.VertexColorEnabled = true;
After you create your vertices, you create an instance of BasicEffect.
The World, View, and Projection properties are used in the vertex
shader portion of the graphics pipeline to transform the input vertices
to draw on the screen. For now, don’t worry about the specific values
for these matrices. The VertexColorEnabled property is set to true to tell the BasicEffect to use the color from each vertex as the output value of the pixel shader.
The final step is to issue the draw call using the DrawUserPrimitives method. Add the following lines of code to your Game class Draw method:
// Start using the BasicEffect
basicEffect.CurrentTechnique.Passes[0].Apply();
// Draw the primitives
GraphicsDevice.DrawUserPrimitives<VertexPositionColor>(PrimitiveType.TriangleList,
                                                       userPrimitives, 0, 1);
Before you can call DrawUserPrimitives, tell the GraphicsDevice to use the BasicEffect. This is done by calling Apply on the EffectPass you use.
Next, call DrawUserPrimitives. This method is generic and expects the vertex type as the generic T type parameter. In this case, pass VertexPositionColor as the vertex type. The first parameter defines what PrimitiveType you want to draw. Specify TriangleList to draw a list of triangles. The second parameter is an array of vertices of the same type used for the generic T parameter. Pass the userPrimitives
array you created previously. The third parameter is used to specify an
offset into the array of vertices. If your array contains multiple
primitive vertices and you want to draw only a subset of those, you can
specify an offset into the source array. For your purpose, you don’t
want any offset, so set the value to 0. The final parameter DrawUserPrimitives
takes the total number of primitives to draw. If your array defines
multiple primitives, specify that number to draw with this parameter.
For this example, you draw only a single triangle, so specify a value of
1.
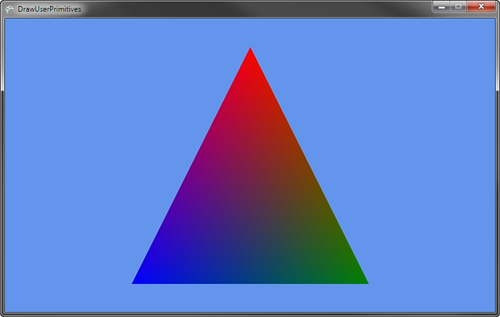
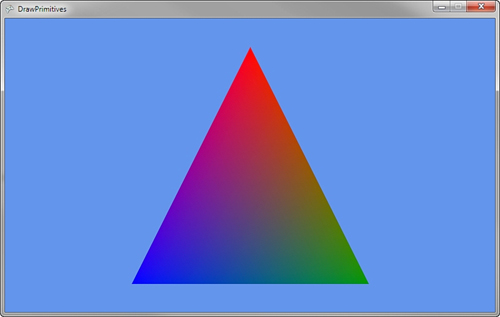
If you build and run the previous example, you should see a single triangle like that in Figure 1.
Notice that each vertex has its own color. and the color of the middle
sections of the triangle change across the triangle to each vertex. This
is called interpolation and occurs on values that are specified per
vertex. Because the color is specified per vertex, the different vertex
colors have to interpolate over the pixels between the two vertices.
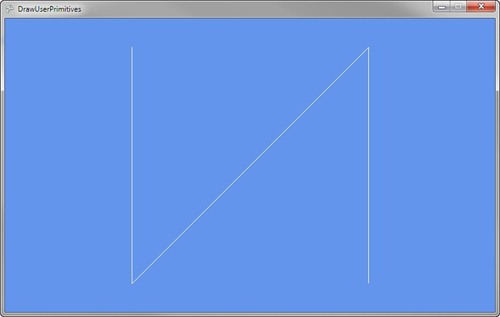
Now let’s update the example to draw multiple primitives using the LineStrip primitive. First, update where the vertices are created with the following lines of code:
// Create the verticies for our lines
userPrimitives = new VertexPositionColor[4];
userPrimitives[0] = new VertexPositionColor();
userPrimitives[0].Position = new Vector3(-1, 1, 0);
userPrimitives[0].Color = Color.White;
userPrimitives[1] = new VertexPositionColor();
userPrimitives[1].Position = new Vector3(-1, -1, 0);
userPrimitives[1].Color = Color.White;
userPrimitives[2] = new VertexPositionColor();
userPrimitives[2].Position = new Vector3(1, 1, 0);
userPrimitives[2].Color = Color.White;
userPrimitives[3] = new VertexPositionColor();
userPrimitives[3].Position = new Vector3(1, -1, 0);
userPrimitives[3].Color = Color.White;
Note
The lines are set to Color.White to help make them more visible. You can use any color just like you would for triangles.
Then, update your DrawUserPrimitives call to specify the LineStrip primitive type and the new number of primitives:
// Draw the primitives
GraphicsDevice.DrawUserPrimitives<VertexPositionColor>(PrimitiveType.LineStrip,
                                                       userPrimitives, 0, 3);
If you run the example now, it should look like Figure 2.
DrawUserIndexedPrimitives
If your primitives commonly use
the same vertices for a number of different primitives, it can save you
memory to use indexed primitives instead. To draw a user indexed
primitive, you need to specify an array of indexes to use when drawing
the triangles. These index values are used to look up each specific
vertex to use when rendering the primitive.
To draw a user indexed
primitive, update the current example. Add an array of index value.
These are integer values that represent offsets into the vertex array
you also pass into the DrawUserIndexedPrimitives method. Update the member variables for your Game class to have the additional index array like the following code:
VertexPositionColor[] userPrimitives;
short[] userPrimitivesIndices;
BasicEffect basicEffect;
Use a 16-bit short array to store the index values. Because each index is represented by a short, the index values can be between only 0 and 65535, which is the maximum positive number a short can represent. You can also use an array of 32-bit int
values, which can store positive values of more than four billion but
this has two repercussions. The first is that storing index values as int
values means that each index takes up two more bytes than when using
shorts thus doubling the memory usage for your index values. The other
is that 32-bit int indexes are supported only in the HiDef GraphicsProfile, so your game must usea HiDef GraphicsDevice.
Next, create the vertices and
index values for your primitives. In this case, draw a square, often
called a quad, that is made of two triangles. Update the existing
example’s LoadContent method to contain the following code:
// Create the verticies for our triangle
userPrimitives = new VertexPositionColor[4];
userPrimitives[0] = new VertexPositionColor();
userPrimitives[0].Position = new Vector3(-1, 1, 0);
userPrimitives[0].Color = Color.Red;
userPrimitives[1] = new VertexPositionColor();
userPrimitives[1].Position = new Vector3(1, 1, 0);
userPrimitives[1].Color = Color.Green;
userPrimitives[2] = new VertexPositionColor();
userPrimitives[2].Position = new Vector3(-1, -1, 0);
userPrimitives[2].Color = Color.Blue;
userPrimitives[3] = new VertexPositionColor();
userPrimitives[3].Position = new Vector3(1, -1, 0);
userPrimitives[3].Color = Color.Purple;

// Create the indices used for each triangle
userPrimitivesIndices = new short[6];
// First Triangle
userPrimitivesIndices[0] = 0;
userPrimitivesIndices[1] = 1;
userPrimitivesIndices[2] = 2;
// Second Trianglel
userPrimitivesIndices[3] = 1;
userPrimitivesIndices[4] = 3;
userPrimitivesIndices[5] = 2;
Like the previous example, create an array of VertexPositionColor to represent the vertices in your primitives. The code creates four vertices: one for each corner of the quad. A short
array is then created to specify which vertex to use for each
primitive. The first triangle uses the top left, top right, and bottom
left vertices making sure to define them in clockwise order. The second
triangle uses the top right, bottom right, and bottom left.
Finally, update your Game class Draw method to use the DrawUserIndexPrimitives method:
// Draw the primitives
GraphicsDevice.DrawUserIndexedPrimitives<VertexPositionColor>(PrimitiveType.TriangleList,
                                                    userPrimitives, 0, 4,
                                                    userPrimitivesIndices, 0, 2);
Like the previous example with DrawUserPrimitives, the DrawUserIndexedPrimitives call is generic and you pass the VertexPositionColor as the generic T
type parameter. The first parameter is again the primitive type. The
second parameter is again the array of vertices. The third parameter is
the vertex offset that should be used. For index primitives, this offset
is added to each index value to obtain the final index to use in the
vertex array. The fourth parameter is the number of vertices that is
used in the draw call. In this case, use four vertices. This parameter
is often the size of the vertex array itself unless you use offsets. The
fifth parameter is the array used to store the index values. For the
example, that is the userPrimitivesIndices
variable. The sixth parameter is the offset into the index array that
should be used. In this case, you don’t need to offset, so the value is
0. The final parameter is again the number of primitives to draw. For
the example, you try two triangles, so a value of 2 is specified.
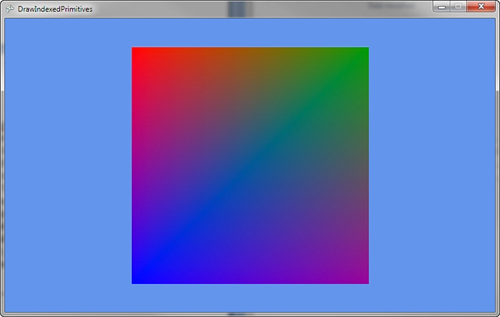
If you build and run the example code, you should see an image like that in Figure 3 where a four-color quad is draw on the screen.
Let’s lower the memory used by the index array by updating the example to just use four index values and use the TriangleStrip PrimitiveType. Update where you create the index array to look like the following:
// Create the indices used for each triangle
userPrimitivesIndices = new short[6];
// First triangle
userPrimitivesIndices[0] = 0;
userPrimitivesIndices[1] = 1;
userPrimitivesIndices[2] = 2;
// Second Triangle
userPrimitivesIndices[3] = 3;
The
second triangle is formed by using the last two index values plus the
new additional value. In this case, the triangle is formed by userPrimitivesIndices[3], userPrimitivesIndices[2], and userPrimitivesIndices[1]. This second triangle saves 32 bits of data by not using two additional index values.
The DrawUserIndexedPrimitives method call needs to be updated to use only PrimitiveType.TriangleStrip and not TriangleList.
If you run the example code now, you will not see any visible
difference yet you are saving valuable memory space. It is not always
possible to save space and use triangle strips; in these cases, you
should use TriangleLists.
DrawPrimitives
Unlike the user versions of the draw primitives methods that use arrays to store the vertex data, DrawPrimitive uses a VertexBuffer to store the vertices for your primitives.
A VertexBuffer stores the vertices in the graphics cards hardware memory where they can be quickly accessed. Unlike when using arrays, a VertexBuffer
does not require the vertices to be sent from the main system memory to
the graphics card each time you want to draw. Sending large amounts of
data from the main system memory to the graphics card is not a fast
operation and can slow down your rendering speed. So for larger
geometry, use a VertexBuffer to store the vertex data and to call the DrawPrimitives method.
First, create two member variables in your Game class: one for the VertexBuffer and another for the BasicEffect. Add the following lines of code to create the member variables:
VertexBuffer vertexBuffer;
BasicEffect basicEffect;
Next, create the VertexBuffer and set the data that is stored inside it. Add the following lines of code to your Game class LoadContent method:
basicEffect = new BasicEffect(GraphicsDevice);
basicEffect.World = Matrix.Identity;
basicEffect.View = Matrix.CreateLookAt(new Vector3(0, 0, 3),
                                       new Vector3(0, 0, 0),
                                       new Vector3(0, 1, 0));
basicEffect.Projection = Matrix.CreatePerspectiveFieldOfView(MathHelper.PiOver4,
                                              GraphicsDevice.Viewport.AspectRatio,
                                              0.1f, 100.0f);
basicEffect.VertexColorEnabled = true;

VertexPositionColor[] vertexData = new VertexPositionColor[3];
vertexData[0] = new VertexPositionColor();
vertexData[0].Position = new Vector3(0, 1, 0);
vertexData[0].Color = Color.Red;
vertexData[1] = new VertexPositionColor();
vertexData[1].Position = new Vector3(1, -1, 0);
vertexData[1].Color = Color.Green;
vertexData[2] = new VertexPositionColor();
vertexData[2].Position = new Vector3(-1, -1, 0);
vertexData[2].Color = Color.Blue;

// Create our VertexBuffer
vertexBuffer = new VertexBuffer(GraphicsDevice,
                                typeof(VertexPositionColor), 3,
                                BufferUsage.None);
vertexBuffer.SetData<VertexPositionColor>(vertexData);
As with the previous example, you first create an instance of BasicEffect and set some of the properties for the transforms and enable vertex coloring.
Again, declare an array of VertexPositionColor and define three vertices. Use this array to set the data to store in the VertexBuffer.
Next, create the instance of the VertexBuffer. The VertexBuffer takes the GraphicsDevice to store the data as the first parameter. Use the GraphicsDevice property of the Game class to use the default GraphicsDevice that is created when your game starts. The second parameter takes the Type of the vertex that is to be stored in the VertexBuffer. Because you want to store vertices of type VertexPositionColor, specify the type using the typeof operator. The third parameter is the number of vertices the VertexBuffer is going to hold. In this case, there are only three vertices. The fourth and final parameter is the BufferUsage. In cases where you know you will never need to read the contents of the VertexBuffer, you can specify BufferUsage.WriteOnly, which causes the VertexBuffer to throw an exception if you ever try to read back any data. Using WriteOnly enables the graphics hardware to chose specific memory locations in the hardware that allow for more efficient drawing.
After the VertexBuffer is created, the SetData method is called to send the vertex data to the graphics hardware. SetData is a generic method that takes the type of vertex data as the generic T parameter. The array of vertices is then passed as the lone parameter. The size of the VertexBuffer must be large enough to store the amount of vertices stored in the array that is passed in. Overloaded versions of SetData
are available that enable you to specify an offset, start index, number
of vertices to set, and the size of each vertex. These overloads are
useful when the source vertex array is slit into multiple vertex
buffers.
The final steps you need to draw are to tell the GraphicsDevice the VertexBuffer you plan to use next and to call the DrawPrimitives method. Add the following lines of code to your Game class Draw method:
// Set which vertex buffer to use
GraphicsDevice.SetVertexBuffer(vertexBuffer);
// Set which effect to use
basicEffect.CurrentTechnique.Passes[0].Apply();
// Draw the triangle using the vertex buffer
GraphicsDevice.DrawPrimitives(PrimitiveType.TriangleList, 0, 1);
The GraphicsDevice is told which VertexBuffer to use by calling the SetVertexBuffer method and passing in the one you created. This is the VertexBuffer that is used when any DrawPrimitives or DrawIndexPrimitives methods are called until another VertexBuffer is set on the GraphicsDevice. Overloads of SetVertexBuffer are available that enable an offset into the VertexBuffer to be specified.
Next, the EffectPass.Apply method is called like in the previous example.
Finally, call the DrawPrimitives method. The first parameter is the PrimitiveType.
The second parameter is the start vertex. This is the vertex in the
buffer to start drawing from. This value is combined with any offset
value set when SetVertexBuffer is
called. The final parameter is the number of primitives to draw, which
you set to 1 because you need to draw only the single triangle.
If you run the previous example code, you see output similar to Figure 4. Notice how this example and the first example that used DrawUserPrimitives produced the same results but use different functions to draw the primitives.
DrawIndexedPrimitives
The final draw primitives called DrawIndexedPrimitives uses both a VertexBuffer and an IndexBuffer. Like a VertexBuffer, the IndexBuffer stores data using the graphics hardware’s memory so it can be quickly accessed by the GPU when drawing. The IndexBuffer stores index values like the ones you used previously when using the DrawUserIndexPrimitives method.
To draw indexed primitives using an index buffer, add a member variable to your Game class to hold the instances of the IndexBuffer, VertexBuffer, and BasicEffect.
VertexBuffer vertexBuffer;
IndexBuffer indexBuffer;
BasicEffect basicEffect;
Next, create the index data to store in the IndexBuffer and create the instance of the IndexBuffer. Also create the VertexBuffer and BasicEffect as you did previously:
basicEffect = new BasicEffect(GraphicsDevice);
basicEffect.World = Matrix.Identity;
basicEffect.View = Matrix.CreateLookAt(new Vector3(0, 0, 3),
                                       new Vector3(0, 0, 0),
                                       new Vector3(0, 1, 0));
basicEffect.Projection = Matrix.CreatePerspectiveFieldOfView(MathHelper.PiOver4,
                                            GraphicsDevice.Viewport.AspectRatio,
                                            0.1f, 100.0f);
basicEffect.VertexColorEnabled = true;

VertexPositionColor[] vertexData = new VertexPositionColor[4];
vertexData[0] = new VertexPositionColor();
vertexData[0].Position = new Vector3(-1, 1, 0);
vertexData[0].Color = Color.Red;
vertexData[1] = new VertexPositionColor();
vertexData[1].Position = new Vector3(1, 1, 0);
vertexData[1].Color = Color.Green;
vertexData[2] = new VertexPositionColor();
vertexData[2].Position = new Vector3(-1, -1, 0);
vertexData[2].Color = Color.Blue;
vertexData[3] = new VertexPositionColor();
vertexData[3].Position = new Vector3(1, -1, 0);
vertexData[3].Color = Color.Purple;

// Create our VertexBuffer
vertexBuffer = new VertexBuffer(GraphicsDevice, typeof(VertexPositionColor),
                                4, BufferUsage.None);
vertexBuffer.SetData<VertexPositionColor>(vertexData);

short[] indexData = new short[4];
// First triangle
indexData[0] = 0;
indexData[1] = 1;
indexData[2] = 2;
// Second triangle
indexData[3] = 3;

// Create our IndexBuffer
indexBuffer = new IndexBuffer(GraphicsDevice, IndexElementSize.SixteenBits,
                              4, BufferUsage.None);
indexBuffer.SetData<short>(indexData);
In the previous code, you create an array of shorts to store the index values. Because you use a triangle strip, you need only four index values. The IndexBuffer is then created. The first parameter is the GraphicsDevice where the IndexBuffer is stored. The second parameter is the size each element in the index buffer is. Remember that index values can be 16-bit short values or 32-bit int values. You select IndexElementSize.SixteenBits to specify that 16-bit index values. The fourth parameter is the number of index values the IndexBuffer holds. You specify 4 the size of your index data array. The last parameter is BufferUsage, which is similar to the same parameter on the VertexBuffer. You specify None, which will enables read back if necessary later.
Finally, tell the GraphicsDevice which IndexBuffer to use when the DrawIndexPrimitives method is called. Add the following lines of code to your Game class Draw method:
// Set which vertex buffer to use
GraphicsDevice.SetVertexBuffer(vertexBuffer);
// Set which index buffer to use
GraphicsDevice.Indices = indexBuffer;
// Set which effect to use
basicEffect.CurrentTechnique.Passes[0].Apply();
// Draw the triangle using the vertex buffer and index buffer
GraphicsDevice.DrawIndexedPrimitives(PrimitiveType.TriangleStrip, 0, 0, 4, 0, 2);
As with the previous examples, you set the VertexBuffer to use and call Apply on the EffectPass you want to use. You also specify the Indices parameter of the GraphicsDevice setting its value to your IndexBuffer. The DrawIndexedPrimitives method is then called to draw a quad on the screen. Like all of the other draw methods, the first parameter is the PrimitveType, which, in this case, is a TriangleStrip.
The second parameter is the base vertex, which is an offset that is
added to each of the values in the index buffer. The third parameter is
the minimum vertex index of all of the vertices used. The fourth
parameter is the number of vertices that are going to be used when
drawing the triangles. The fifth parameter is the starting index to use
in the index buffer. The last parameter like the other draw methods is
the number of primitives to draw.
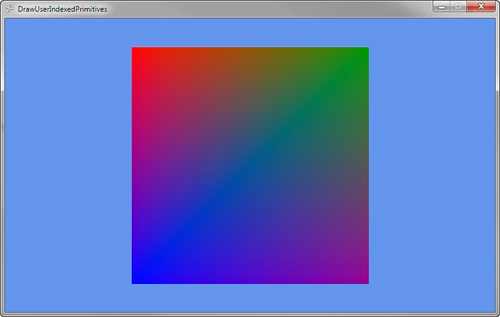
If you run the example code, you should see a colored quad similar to the one in Figure 5.